Shop/lister

How To Create Bundles in Shop Page


Bundling is basically taking a product you sell and offering it along with another product (this could be an accessory or simply a related item) thereby creating a product bundle.


How to create a bundle?

Go to online admin page. Will see BUNDLES navigation link click on it. A Bundle panel is opened (like this).

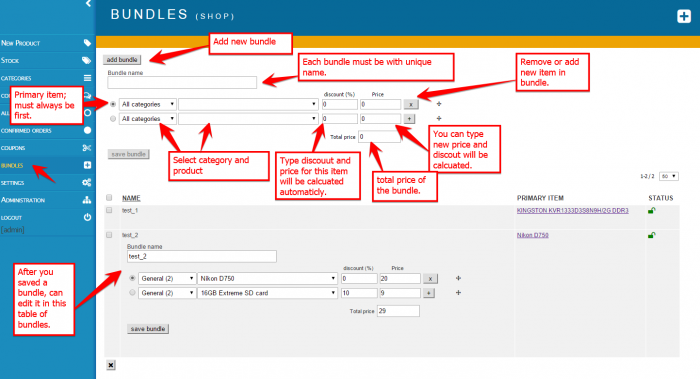
To add new bundle click on "Add bundle" button. Will see bundle form.

Each row is a product which is selected with two drop-downs: Categories and Products. When chose a product, you can specify discount (in %) from 0 to 100.

A new price for this product will be calculated base on the discount. Or can type a new price and discount will be calculated.

Notice: this new price will be available only in this bundle and will not effect when buy this product out of the bundle.

In the beginning of the row is a radio button - Primary item. In order to successfully save a bundle only first item must be primary.

When bundle is saved will see it in bundle table below. Each bundle can be deleted, published/unpublished and edited.

Third column is PRIMARY ITEM and it contains the name of the primary item in the bundle with link to front detail page of the item.


Where to add bundle macro?

  1. In order to view bundle in your shop page have to add  %bundles% macro in product detail page.
  2. You need Minicart or Basket cart in shop detail page. "How to put Mini-Cart or Cart page (Basket) in Pop Up window (Hidden Div)
  3. to enable 'USE AJAX' option in shop settings.

Notice: Bundle will be visible only in Primary item front detail page. NOT in other items which are included in bundle.

This is what users will see when visit primary item page.

If item has discount > 0 will see discount in % in red rectangle in right top corner of item image.

The old price is line-through and it is in grey color. New discounted price is below.

After all items in bundle will see Buy link with total price.


When click on "Buy all for" link the bundle will be added in cart.

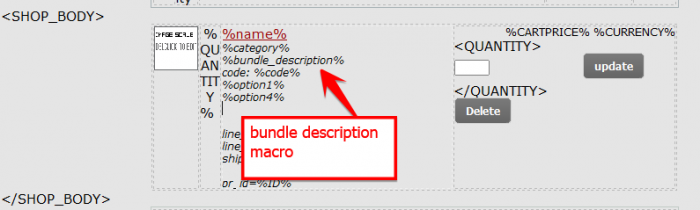
In order to see bundle description: item1 + item2 + .... ( Nikon D750 + 16GB Extreme SD card )

have to add new macro %bundle_description% in cart and in online notification email messages.


Print  posted by miro   Shop/lister tags:  bundle   permalink
0 0

How to display Blog/Shop category links on other pages in website


 use this code to add text links for shop/blog/photoblog categories on different page or editable area (even for pages in different project)


use insert html and following code :


for vertical list:

 < script type="text/javascript" src="../shop/shop.php?category_vlist">< /script >


for horizontal list:

 < script type="text/javascript" src="../shop/shop.php?category_hlist">< /script>


style of links can be tweaked by adding extra css to page :

for example

.ver_cat_list a{font:11px verdana;color: #c0c0c0;}

or

.hor_cat_list a{font:11px verdana;color: #c0c0c0;}


Print  posted by miro   Shop/lister tags:  categories • link • shop • catalog   permalink
3.5 2

How to put Mini-Cart or Cart page (Basket) in Pop Up window (Hidden Div)


Adding of products to cart use ajax (without reloading page) and there is opportunity to add mini-cart or cart in popup window using Hidden Div widget. When Popup window is defined, Popup will open automatically each time user adds product to cart.
 

  1. Adding MINI-C
  2. ART in popup window
    In categories and product page create Hidden div widget with MINI-CART macros:


    Notice: make sure you define MINI_CART macro in both categories and product detail page.


  3. Adding CART (Basket) in popup window

      To display basket page in popup, add Hidden Div in categories and product page with following macros:


        4.  Enable "USE AJAX" in shop online settings


Print  posted by miro   Shop/lister tags:    permalink
0 0

How to use "Exchange rate" in shop pages


Exchange rates are just numbers which you can use in calculaton. They are not altrnative currency prices. 
The main indea of this section is to define the ratio of each exchange rate, and use it globally among the given shop subpages, thus saving time in replacing values for exchange rates on a daly basis.

  • Create exchange rates macros:
  1.  Go to shop online admin page and click on "SETTINGS" navigation tab.
  2.  Click on "exchange rate" button.
  3.  In Exchange Rate Options table you can add currencies with rates. You can only use lowercase characters and underscore for the currency name and floating point  numbers or whole numbers for the rate.
  4.  When finished adding currencies with rates click on "Save" button and now you have macros currencies in your database. Those currencies are available only for current shop page.
  • Use exchange rates in shop page (img.1):
  1. Open you project in Ezgenerator and go to the shop page for which you create Exchange Rates (currencies macros).
  2. Click on "categories", for example.
  3. in "CART" you can type: %EVAL(%your_currency_name%<*>%SHOP_TOTAL%)%  or other formula
  4. Publish your changes.
  5. In the end eval function multiplies current SHOP_TOTAL by your exchange rate.

Print  posted by miro   Shop/lister tags:  macros • tutorial • shop • settings   permalink
0 0

Linking Shops


multiple shops can be linked to single products database

in this example SHOPA is main shop with source products database and SHOPB is linked shop (will use products database from SHOPA). Also we will create new price field in SHOPA to use different prices for same products in SHOPB (this is not required, both shops can also use same prices)


follow this steps to link SHOPB to SHOPA:


1. Make sure both shops are on same directory level (either both in ---root--  or both in 2nd level folders)

2. in SHOPA, go to shop settings, data and add new field of type 'price', (in this example we will give it name price2)

3. in SHOPB, go to shop settings, settings and define LINKED ID property, Linked ID is internal Ezgenerator page ID of SHOPA, you can find this id on status bar:


status bar


4. to use price field, set 'Linked Price Field' to 'price2' (name of field we created in step 1), also you will have to replace all %price% macros on pages of SHOPB with macro %price2%


5. do upload and login to SHOPA first (to apply database changes), then to SHOPB


end...


how things works:

both shops use their own databases for orders/settings, but share products database from SHOPA

some things you have to know:

- all shop settings defined inside EzGenerator and in online administration are not shared between SHOPA and SHOPB (except for data)

- if you visit administration panel of SHOPB, you actually edit products from SHOPA

- stock information is shared between SHOPA and SHOPB


since version 4.0.0.459 you can limit products/items in shopB by using "limit by" option:


1. in SHOPA define new field (let's call it : "linked") of type boolean

2. in SHOPA set for all products which you want to use in SHOPB, value for field "linked" to TRUE (or YES)

3. in SHOPB settings select "linked" as "limit by" option


Print  posted by miro   Shop/lister tags:  e-commerce   permalink
3.8 4


[home] [prev]  1 2 [3] 4 5  [next]11-15 of 22


CATEGORIES


TAGS


RECENT ENTRIES