Adding custom shipping list rates (like pickup, delivery services such as DHL, FedEx and so.on)


Many times shipping rates is based on different delivery services like DHL, FedEx which don't have same tax.
With this tutorial you can add shipping list with post services in checkout page.
When users change list of this shipping rates, %shipping% macro is changed too based on assigned value.


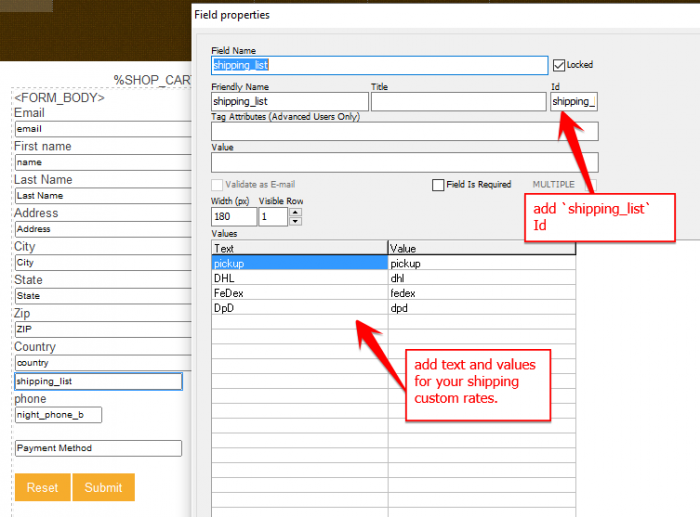
  1. Go to EZG and click on checkout shop page. In add 'List field' macro with name `shipping_list` with size 1.
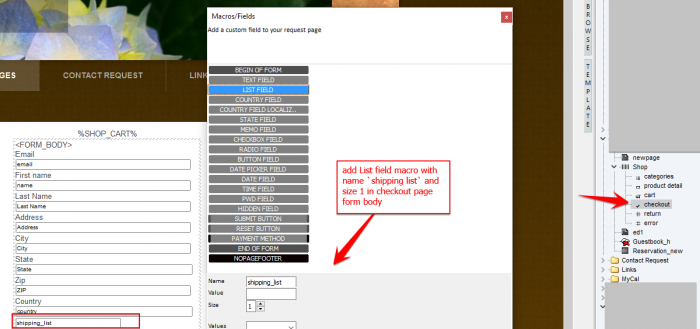
  2. Double click on added 'List field' and create your values and text. Add shipping_list Id to the field.
  3. Go to online shop admin  settings panel and click on shipping tab. Change shipping type to `based on custom sipping list`. Assign custom shipping rates with values (amount).
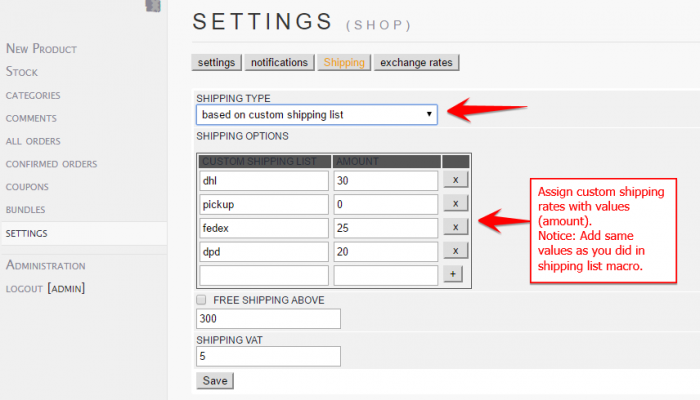
    Notice: Add same values as you did in shipping list macro.

Print  posted by miro   Shop/lister tags:  shipping • delivery services • shipping_list   permalink
1.1 136

Adding Google Analytics to Admin Panel of Your Site


Before add Google Analystic to Admin Panel you need to be sure that:
1. You use one of the Fullscrean presents for Online Administration (CA). This can be changed in Project Template->Template Editor->Online Aministration then change Preset drop down to Fullscreen...
2. Google Analystics plugin is enabled in Project Settings->Online Administration.

3. You added Google Analystics to You Website. Be sure for next steps you use same google account (email) as you use to access your tracking code from Google.


If those 3 steps are accomplished then you need to create Google Client ID for web applications in Google developers page and insert it in settings online admin panel of your site. To do that folow:

  1. Go to https://console.developers.google.com/project. Use same account as you did when access Tracking code from Google
  2. If you don't have projects have to create one:
  3. Go to you created project and click on "APIs and auth" tab. Here in "Consent screen" you need to confirm you Email Address and add Product name then click Save. In "Credentials" you will create Client ID for Web Applications using your hostname.


     4.   Now have to Enable Analystics API in APIs:


      5.  Go to  Credentials  again and copy Client ID:


     6.  Paste this ID in ANALYTICS CLIENT ID in online admin settings panel of your site.
     7.  All you have to do now is in ANALISTICS tab in online admin panel to Access Google Analystics by simply confirm your Google account.


Print  posted by miro   General tags:  google • analystics   permalink
1 1

Adding Google Analytics to Your Website


Here are steps on how to add Google Analytics to your website (in EzGenerator)


1. Sign up for Google Analytics

2. Access your tracking code.

3. Add the tracking code to your project (see image)


Print  posted by miro   General tags:  Google • Analytics   permalink
0 0

Adding Published / Unpublished dates to shop products


With  Published / Unpublished dates you can set products which will be published between those two dates ( like promo products ).

To activate this future have to add two shop custom fields:


  1. published_date (field type: datetime )

  2. unpublished_date (field type: datetime )


After Upload your project changes and Click on "Update database" button in shop Online Administration "settings" section you will see 

PUBLISHED_DATE / UNPUBLISHED_DATE row when edit or create new product. (In order to work, "PUBLISHED" checkbox of your product must be enabled).

First date is published date and by default it gets value of the created or updated date of the product.


By default unpublished date is not set so product will not have expired date. To activate unpublished date click on checkbox "unpublish":


Now all you have to do is set proper dates and this product will be published only in this period PUBLISHED_DATE - UNPUBLISHED_DATE.


Print  posted by miro   Shop/lister tags:  published date • unpublished date • shop • promo product   permalink
0 0

Adding shop output on other pages (external shop macros)


there are several macros available to display shop output on other pages :

to add all this macros on other page, use ezgenerator 'insert html' function

1. to display vertical or horizonatl shop category list, add following code :
                                                                             
<script type="text/javascript" src="http://miro.image-line.com/max4_jquery/shop/shop.php?category_vlist"></script>

or

<script type="text/javascript" src="http://miro.image-line.com/max4_jquery/shop/shop.php?category_hlist"></script>

2. to display shop minicart, add :

<script type="text/javascript" src="http://miro.image-line.com/max4_jquery/shop/shop.php?action=minicartjs"></script>


notice, minicart has to be also used on shop main or category page

3. to display shop tag cloud, add:

<script type="text/javascript" src="http://miro.image-line.com/max4_jquery/shop/shop.php?action=tagcloud"></script>

4. to display random shop product, add following code:

<script type="text/javascript" src="http://miro.image-line.com/max4_jquery/shop/shop.php?action=random&count=2"></script>


available parameters :
count : number of random products to be displayed
dir:   dir=h (products will be displayed horizontaly)
root:    specify root=1  if  destination page is in website root
file: path to file with random macro template (you have to use this parameter if you don't have random macro included on shop main page)

--> create extra page in your project (you can made this page hidden in menu) and copy random macro to this page, then use page relative path as file parameter

example of random macro in this file :

random macro


notice: random macro has to be also used on shop main or category page

example page with external shop macros


Print  posted by miro   Shop/lister tags:  external • shop • macros • random   permalink
5 1


[prev]  1 [2] 3 4 5 6 7 ... 23 [next]6-10 of 115


CATEGORIES


TAGS


RECENT ENTRIES