Scroll to given element on the page.


Some examples about how to scroll to a given page element.

All this code must be wrapped into <script type="text/javascript>custom code stays here</script> tags.


Scroll to the element on page load:


$(window).load(function() {

$('html, body').animate({ scrollTop: $("<selector>").offset().top},2000);

});


Scroll to the element on page ready:


$(document).ready(function() {

$('html, body').animate({ scrollTop: $("<selector>").offset().top},2000);

});


Scroll to the element on click:


$("<selector>").click(function{

$('html, body').animate({ scrollTop: $("<selector>").offset().top},2000);

});


2000 - Time in milliseconds (1000 ms = 1 s) that the animation needs to complete. Reduce the amount for quicker and increase for slower motion.


More info about the <selector> and how to use it here: JQuery selectors - how to select items on page properly
 

Print  posted by atanas   Jquery/Ajax tags:  javascript • scroll • top   permalink
5 1

Send Mail through GMail SMTP Server


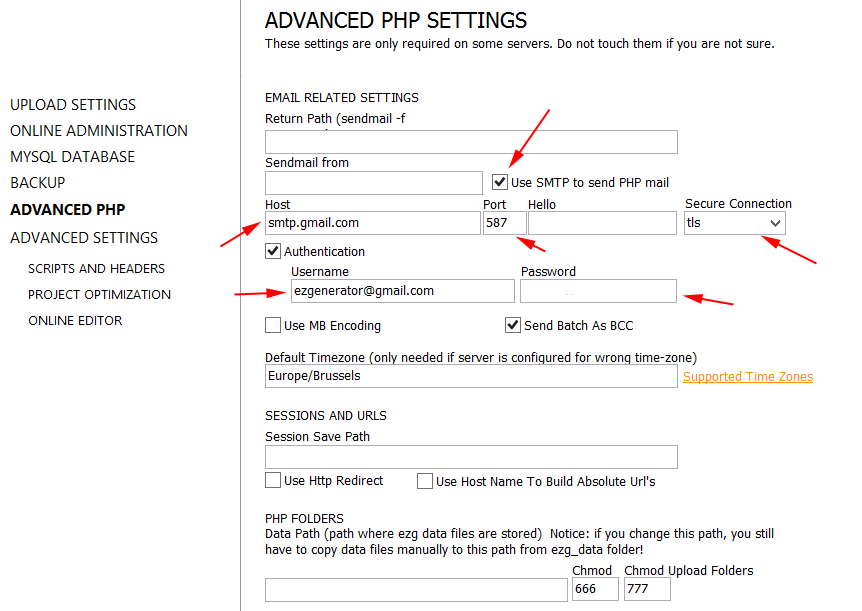
To use Gmail for mail in ezg website, use this PHP settings (with your own e-mail and password) :


notice :  To send mail via gmail extension=php_openssl.dll must be enabled on your server (in php.ini)


Print  posted by miro   MySql/Php tags:  gmail • smtp • e-mail   permalink
0 0

Set up Catalog/Shop in EZG v4


To set up a Catalog/Shop page in EZGenerator 4, first of all you need MySQL to do this. Get credentials from your provider (or set up MySQL database in your server, if server is yours). EZGenerator cannot create the database automatically. The database is one of the parameters required in the MySQL settings inside EZGenerator, so make sure you have this set up before you activate the MySQL in your project.


To make a shop page:

  1. Go to EZGenerator program and open Project Settings -> MYSQL Settings;
  2. Fill the information required. Ask your provider or check your server settings for the credentials;
    • In most cases (when the site and the MySQL server are on the same working station, the host is "localhost";
    • Note: It's recommended to add project prefix for every project you have. This prefix should be unique (different for every project)!;
  3. Check the "Use MySQL for all live pages" checkbox. You won't be able to do this until all the other fields are filled;
  4. Now you have the Shop/Catalog pages non-grayed (and also included in the page types list) when you try to add one of them.
  5. Add the desired page and make all the layout changes you want (using the macros and custom code on the template pages);
  6. Add payment process partner (if needed). It's explained in this howto section (one of the other threads);
  7. Publish the site;
  8. In Online Administration go to your Shop/Catalog back office and manage the page. All the changes (adding/editing products, part of the Shop/Catalog pages settings, orders, categories) are managed via the Online Administration;


Note: What you cannot find in the Settings module of the Shop/Catalog inside Online Administration, you can find inside EZGenerator. When your Shop/Catalog is selected in the project tree, click on the Shop/Catalog Settings tab or the Page Settings tab to change the current settings.


Print  posted by atanas   General tags:  shop • catalog • setup • mysql   permalink
4.5 2

Shop Features - Compare Products


With Shop Product Features you can specify unique features for each product category. Same features can be used in different categories.

For example, you have 2 categories of products:


1. mobile phones with features : OS, Memory, Connectivity, Display Size, Battery

2. monitors with features : Display Size, 3D, HD


when defined, you can specify feature settings for each product

product features are displayed on product page as list (use %FEATURES% macro to display features on page)

user can add features to "compare products list" (use %COMPARE_ADD% macro)

and compare products (use %COMPARE% to display list of products added to compare list)


Print  posted by miro   Shop/lister tags:    permalink
0 0

Slideshow macro


in Photoblog, Image galleries can be displayed as slideshow.

you can use % SLIDESHOW % macro to display slideshow, by default, Fotorama slideshow is used

if you prefer to use other slideshow type, you can use use this options:


% SLIDESHOW(1)%  (to display slideshow type I)

% SLIDESHOW(2)%  (to display Multibox slideshow with thumbnails)

% SLIDESHOW(3)%  (to display Multibox slideshow with single thumnail image)

% SLIDESHOW(4)%  (to display slideshow type II)

% SLIDESHOW(5)%  (to display Fotorama slideshow)


Fotorama Slideshow support 2 extra parameters (lazy load and titles, both enabled by default)

% SLIDESHOW(5,1,1)% 


Print  posted by miro   Photoblog tags:  slideshow • photoblog   permalink
0 0


[prev] 1 ... 17 18 19 [20] 21 22 23  [next]96-100 of 115


CATEGORIES


TAGS


RECENT ENTRIES