General

IF macro


The IF macro will check the logical condition of a statement and return one value if true and a different value if false.


syntax:

%IF(condition, value-if-true, value-if-false)%


available operators (in condition)  :

<> Not equal
<= Less than or equal to
=> Greater than or equal to
= equal
< Less than
> Greater than
&&      And
|| Or


only one condition at time is allowed


some examples:

%IF(%sale_price% = ,%price%,%price% SALE: %sale_price%)%

(display sale price when available, otherwise display normal price)


%IF(%%price%% < 1.00, Budget Price , )%

(displays text "Budget Price" when price is lower < 1)


%IF(%short_description%=,There is no short description for this item!,)%

(displays text when short_description field is empty)


Print  posted by miro   General tags:  macros • if   permalink
0 0

Multi-user page content


Have You ever needed a place, where every site user has it's own content, and You don't need to make hundreds of pages to achieve that?
In that case all You need is an Online Editable Page. Something pretty familiar if You've used the program for enought time. But how to make users able to use it for their own purposes?

Here is the preparation process:

  1. Add an Online Editable Page
  2. In Online Editable Page Settings (tab) check "User-Dependent Content". 
  3. If you wish, You can check the other two options as well.
  4. Add from macros EDITABLE AREA. It's the key (and main page tool) for entire idea to work.
  5. You can use the macros to put some extra info, like the USERS macro that will allow all user pages to be accessible.
  6. Again optional - you can protect the page so users see only their own page and content (in this case the USERS macro won't work).
  7. Once the Online Editable Page is prepared, go online and log in as Admin. 
  8. Give the users you want to be able to edit their own pages "Edit" access to this page
  9. Enjoy (maybe better test before that to be sure You indeed will enjoy).


 Some extra info about the admin:

  • As admin you can edit other users editable areas. Just log in to the page and select the user. Page content will change to selected user's one.
  • Default (all users) option will change to all users, that haven't changed their content to something else, but use the common one. For the other users changes has to be done per user.

Print  posted by atanas   General tags:  editable page • multiple • content • users   permalink
4.3 3

Multibox for images added in the online text editor


When you add posts in Blog or products in the Shop, you add images in the online editor.

In some cases you may need to apply multibox effect to these images.


Here are the steps to achieve this:


A.) if you are using Innova Editor:

  1. Insert an image
  2. Select the image (added in step 1) in the editor
  3. Click on Styles button to open style sidebar
  4. Apply style: multibox
  5. Set the image as hyperlink and link it to some other image (image you want to display with multibox effect)
    styles

B.) if you are using Tiny_mce Editor:

  1. Insert an image
  2. In image properties dialog, select "appearance" tab and select class "multibox"
  3. Set the image as hyperlink and link it to some other image (image you want to display with multibox effect)


This is applicable to Blog, Podcast, Shop, catalog and Online Editable page (not to normal pages with editable macros)


Print  posted by miro   General tags:  blog • shop • multibox • editable page   permalink
4 3

Page Redirect


to redirect page (after few seconds) to different page, you can use html redirect (you can add this code in page settings --> advanced --> page scripts)

< meta HTTP-EQUIV="REFRESH" content="0; url=http://www.yourdomain.com/index.html">

The above HTML redirect code will redirect your visitors to another web page instantly. The content="0; may be changed to the number of seconds you want the browser to wait before redirecting.


Print  posted by miro   General tags:  redirect • scripts   permalink
0 0

Protect Files (Download)


To protect files from visitors (and make them only available for logged users), you can create protected folders inside Media Library (online administration)

To create protected folders :

1. in Online Administration --> settings (on-line), enable option : Protect Downloads

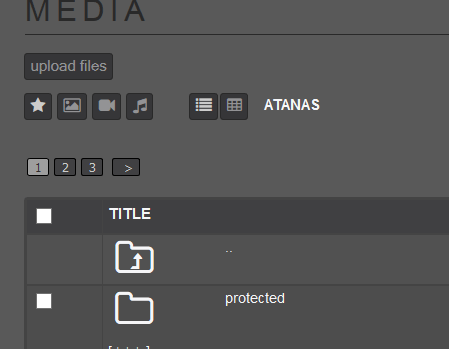
2. In Media library create new folder, notice this folder must be 2nd level folder, you can't protect main level folder

e.g.  you can create folder admin/my_protected_folder or username/my_protected_folder


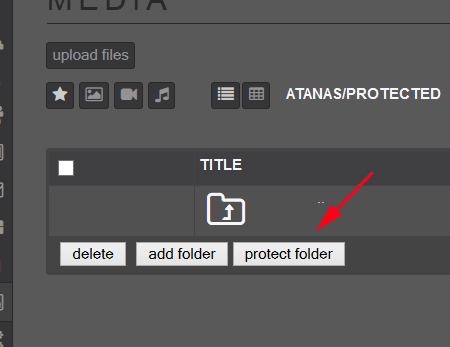
3. open folder you created in 1. and click on 'Protect folder' button (bottom of screen)


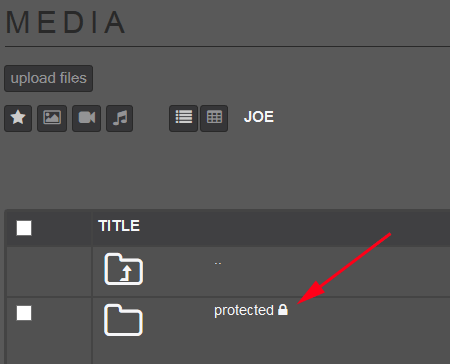
when folder is protected, you will see protection icon next to folder name


files in protected folder can't be accessed from outside (you also can't directly display them on page)

to make them accessible to logged users, create hyperlink and link file from this folder in online editor (in online editable pages for example)


Print  posted by miro   General tags:    permalink
0 0


[home] [prev]  1 2 3 [4] 5  [next]16-20 of 23


CATEGORIES


TAGS


RECENT ENTRIES