How to add and use shop custom fields
To use add custom fields to the shop products data, follow these steps:
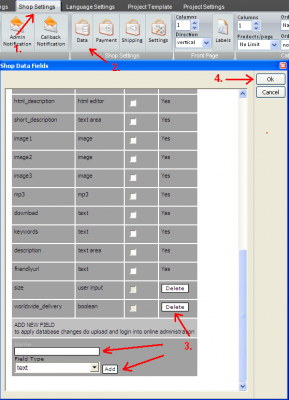
- Open the shop page settings
- Open the Data dialog
- Edit the fields
- Confirm the changes

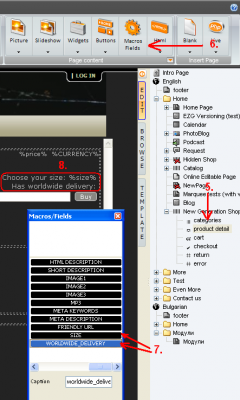
- Open the page where the changes should be visible.
-
Open the macros fields dialog
- Select the new fields from the macros list
-
Place the macros to the desired place

- Upload your project changes
-
Go to the shop Online Administration
-
Go to the "settings" section
-
Click on "Update database" button
-
Modify the products (or add new ones)
Note: User input field does not have corresponding field in the products management section (as this is something users fill, not the shop moderator).
How to display Blog/Shop category links on other pages in website
use this code to add text links for shop/blog/photoblog categories on different page or editable area (even for pages in different project)
use insert html and following code :
for vertical list:
< script type="text/javascript" src="../shop/shop.php?category_vlist">< /script >
for horizontal list:
< script type="text/javascript" src="../shop/shop.php?category_hlist">< /script>
style of links can be tweaked by adding extra css to page :
for example
.ver_cat_list a{font:11px verdana;color: #c0c0c0;}
or
.hor_cat_list a{font:11px verdana;color: #c0c0c0;}
Set up Catalog/Shop in EZG v4
To set up a Catalog/Shop page in EZGenerator 4, first of all you need MySQL to do this. Get credentials from your provider (or set up MySQL database in your server, if server is yours). EZGenerator cannot create the database automatically. The database is one of the parameters required in the MySQL settings inside EZGenerator, so make sure you have this set up before you activate the MySQL in your project.
To make a shop page:
- Go to EZGenerator program and open Project Settings -> MYSQL Settings;
- Fill the information required. Ask your provider or check your server settings for the credentials;
- In most cases (when the site and the MySQL server are on the same working station, the host is "localhost";
- Note: It's recommended to add project prefix for every project you have. This prefix should be unique (different for every project)!;
- Check the "Use MySQL for all live pages" checkbox. You won't be able to do this until all the other fields are filled;
- Now you have the Shop/Catalog pages non-grayed (and also included in the page types list) when you try to add one of them.
- Add the desired page and make all the layout changes you want (using the macros and custom code on the template pages);
- Add payment process partner (if needed). It's explained in this howto section (one of the other threads);
- Publish the site;
- In Online Administration go to your Shop/Catalog back office and manage the page. All the changes (adding/editing products, part of the Shop/Catalog pages settings, orders, categories) are managed via the Online Administration;
Note: What you cannot find in the Settings module of the Shop/Catalog inside Online Administration, you can find inside EZGenerator. When your Shop/Catalog is selected in the project tree, click on the Shop/Catalog Settings tab or the Page Settings tab to change the current settings.


