System requirements:
- Windows XP/ Vista / Windows 7 /Windows 8
- Internet Explorer 8 (or higher version)
- Screen resolution: 1024 x 768 pixels or higher
- Internet connection
- Latest Flash installed in Internet Explorer
Server Requirements:
EZGenerator created sites will work on any web server.
- PHP Requirements - you need minimum PHP 5 installed on server, if you use any of the PHP pages and features (as Blog, Podcast, Photoblog, Calendar, Newsletter, Guestbook, Tell a friend, Request, Shop, Search, Counter, RSS Parser and Online Administration panel ).
- MySQL Requirements - you also need minimum MySQL 4.1, if you have switched project to MySQL and use any of the PHP driven pages and features.
How to install EZG v4:
- Go to https://support.image-line.com/action/profile and login
- Click on EZGenerator link under My Licenses section
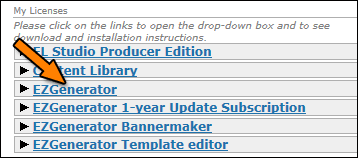
If you have problems with your account and can't find My Licenses section, visit our Ticketing system and post request at: https://support.image-line.com/action/ticketing/post-ticket
- Go to EZGenerator 4.x procedure section and download EZG 4 installer
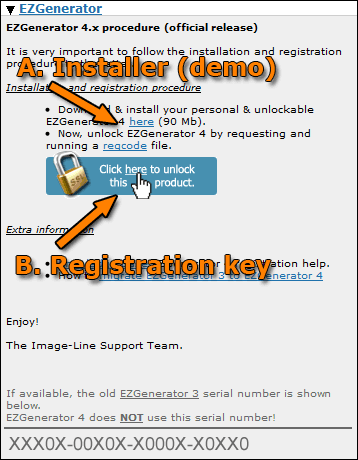
- Download the registry file by clicking on regcode link (.reg)
- Install EZG 4. You don't need to uninstall EZG 3. Install EZG 4 in different folder in Program Files.
- Run the registry code file that you have already downloaded
How to transfer v3 project to v4:
- Make sure your project is using latest available version of template, still in V3, search for template updates and if newer version of template is available, download and apply it to project before moving project to V4!
- Copy your project from Program Files/ezgenerator3/data/ folder and paste it into Program Files/ezgenerator4/data/ folder
- Open your project in EZG 4
- Do Full Build
Possible problems with v4:
- Catalog and Contacts modules are removed. You don't have local database anymore. All pages that read data from this local database will not work in EZG v4 (as non-php Catalog/Contacts lister). You will have to replace them with the new MySQL pages (catalog and shop).
- In EZG v3 standard shop/catalog pages use Catalog module to store data. You can have multiple shop pages using same database from catalog module. In EZG v4 shop/catalog pages use MySQL only and each shop/catalog page has its own database table.
Important: If you use standard shop (non-mysql) along with Catalog module and you want to keep them, DON'T move to EZG v4.
If you have standard shop/catalog (non-mysql) and want to move to MySQL shop/catalog, you have to add new shop/catalog page and make one time data conversion. Don't panic, you will not loose your existing shop data. After you add new shop page and upload on server, you have to go to Shop online admin panel. There is option Import, where you will be lead step by step into the date conversion process.
- You may encounter problems with old page layouts. If this is the case, re-load the layout - right-click inside page and select Page Layout Presets, then Load Page Layout Preset and select certain layout.
- For all form pages (as Newsletter and Request) make sure to open email field properties (by double-clicking on the email field in EZG) and check Validate as email.
- You have to use only v4 compatible templates. You can check if your template is v4 compatible at http://www.ezgenerator.com/documents/webtemplates.html (simply check if it is in the list). Also make sure you are using latest version of template. If you are using template that is not in this list, you better continue using EZG v3 for this project.
MySQL support:
EZG V4 can use MySQL for all php features (Blog, Calendar, Counter, Search, etc).
You set your project to either use MySQL, or flat files. You can't have MySQL blog and flat file calendar in same project.
Only shop/catalog page always use MySQL. There is no flat file catalog/shop.
To switch your existing project to MySQL, you have to go to Project Settings >> MySQL Settings an check Use MySQL for all Live pages and do Full build.
Important: If you switch your existing project to MySQL, all php features (Blog, Calendar, Counter, Search, etc) will be automatically transferred to MySQL, which means data will be moved from flat file to MySQL. So, you will not loose existing data!
What if I use separate database for each MySQL shop page?
In v4 all pages use same database, but each has its own database table.
1) you need to use phpmyadmin panel (this is administrator MySQL panel)
2) you have to choose one database that you will use for your project
3) you have to export all other databases (that you use for shop pages) and then import the tables in the central database that you will use
