Linking Shops


multiple shops can be linked to single products database

in this example SHOPA is main shop with source products database and SHOPB is linked shop (will use products database from SHOPA). Also we will create new price field in SHOPA to use different prices for same products in SHOPB (this is not required, both shops can also use same prices)


follow this steps to link SHOPB to SHOPA:


1. Make sure both shops are on same directory level (either both in ---root--  or both in 2nd level folders)

2. in SHOPA, go to shop settings, data and add new field of type 'price', (in this example we will give it name price2)

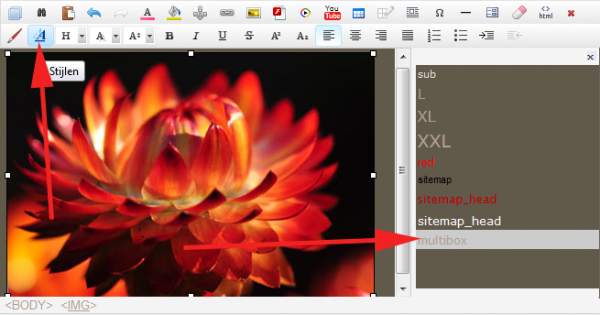
3. in SHOPB, go to shop settings, settings and define LINKED ID property, Linked ID is internal Ezgenerator page ID of SHOPA, you can find this id on status bar:


status bar


4. to use price field, set 'Linked Price Field' to 'price2' (name of field we created in step 1), also you will have to replace all %price% macros on pages of SHOPB with macro %price2%


5. do upload and login to SHOPA first (to apply database changes), then to SHOPB


end...


how things works:

both shops use their own databases for orders/settings, but share products database from SHOPA

some things you have to know:

- all shop settings defined inside EzGenerator and in online administration are not shared between SHOPA and SHOPB (except for data)

- if you visit administration panel of SHOPB, you actually edit products from SHOPA

- stock information is shared between SHOPA and SHOPB


since version 4.0.0.459 you can limit products/items in shopB by using "limit by" option:


1. in SHOPA define new field (let's call it : "linked") of type boolean

2. in SHOPA set for all products which you want to use in SHOPB, value for field "linked" to TRUE (or YES)

3. in SHOPB settings select "linked" as "limit by" option


Print  posted by miro   Shop/lister tags:  e-commerce   permalink
3.8 4

Make borders rounded


If you like given template, but don't like the square borders - don't worry! You can fix this.


First of all - it depends on the template you're using. Most of them are using images for this.


If there are no images for the borders, do following:

 1. Open Template Editor

 2. Open CSS tab.

 3. Find and change the two properties: box-radius and box-shadow


For more info, check
http://www.css3.info/preview/rounded-border/
and
http://www.the-art-of-web.com/css/border-radius/


Note: These two CSS properties are not new, but they are only supported by IE9 and up (and of course by all other browsers).
Most of the templates are made before IE9 was available, so they were made with images, not with background colors.
That's why in many templates You will have to first replace images with colors to make this work and, of course, it will never work for IE8, IE7 IE6 users. They will see square borders instead.


Print  posted by atanas   Templates tags:  border • template • style • css3   permalink
5 1

Make page transparent


(Works for all templates)


 1. Open Templates from the side menu.
 2. Open the CSS tab (first one).

 3. Mark (click on) the tab $xm1
 4. Find the Opacity field and enter there the percent of opacity you want to use.
 5. Confirm.

Note: This transparent trick will also make page content transparent!


Print  posted by atanas   Templates tags:  transparent • style • customize   permalink
0 0

Multi-user page content


Have You ever needed a place, where every site user has it's own content, and You don't need to make hundreds of pages to achieve that?
In that case all You need is an Online Editable Page. Something pretty familiar if You've used the program for enought time. But how to make users able to use it for their own purposes?

Here is the preparation process:

  1. Add an Online Editable Page
  2. In Online Editable Page Settings (tab) check "User-Dependent Content". 
  3. If you wish, You can check the other two options as well.
  4. Add from macros EDITABLE AREA. It's the key (and main page tool) for entire idea to work.
  5. You can use the macros to put some extra info, like the USERS macro that will allow all user pages to be accessible.
  6. Again optional - you can protect the page so users see only their own page and content (in this case the USERS macro won't work).
  7. Once the Online Editable Page is prepared, go online and log in as Admin. 
  8. Give the users you want to be able to edit their own pages "Edit" access to this page
  9. Enjoy (maybe better test before that to be sure You indeed will enjoy).


 Some extra info about the admin:

  • As admin you can edit other users editable areas. Just log in to the page and select the user. Page content will change to selected user's one.
  • Default (all users) option will change to all users, that haven't changed their content to something else, but use the common one. For the other users changes has to be done per user.

Print  posted by atanas   General tags:  editable page • multiple • content • users   permalink
4.3 3

Multibox for images added in the online text editor


When you add posts in Blog or products in the Shop, you add images in the online editor.

In some cases you may need to apply multibox effect to these images.


Here are the steps to achieve this:


A.) if you are using Innova Editor:

  1. Insert an image
  2. Select the image (added in step 1) in the editor
  3. Click on Styles button to open style sidebar
  4. Apply style: multibox
  5. Set the image as hyperlink and link it to some other image (image you want to display with multibox effect)
    styles

B.) if you are using Tiny_mce Editor:

  1. Insert an image
  2. In image properties dialog, select "appearance" tab and select class "multibox"
  3. Set the image as hyperlink and link it to some other image (image you want to display with multibox effect)


This is applicable to Blog, Podcast, Shop, catalog and Online Editable page (not to normal pages with editable macros)


Print  posted by miro   General tags:  blog • shop • multibox • editable page   permalink
4 3


[prev] 1 ... 14 15 16 [17] 18 19 20 ... 23 [next]81-85 of 115


CATEGORIES


TAGS


RECENT ENTRIES