How to use custom Fonts


By default EzGenerator include standard collection of web-fonts and Google Fonts in dialogs and screens, but it's also possible to manually include Font-Face fonts.


1. add rules for each fonts in project css (project template --> template editor --> template css)

example of font-face rule (for font with name : DeliciousRoman) :


1.a (when font is stored on external server)

@font-face{font-family: DeliciousRoman ; src: url('http://www.font-face.com/fonts/Delicious-Roman.eot'); src: url('http://www.font-face.com/fonts/Delicious-Roman.ttf') format('truetype'); font-weight: normal; font-style: normal;}


1.b (when font is stored on your own server)

@font-face{font-family: DeliciousRoman; src: url('fonts/Delicious-Roman.eot'); src: url('fonts/Delicious-Roman.ttf') format('truetype'); font-weight: normal; font-style: normal;}


2. create file with name font_faces.ini in ezgenerator /webtemplates /___shared / font_faces.ini folder

edit this file with notepad, add name of each font you want to include on separate line :


3. in case you store fonts on your own server (1b) , make new folder in your project: 

project /web /documents /fonts and copy fonts files to this folder


DeliciousRoman


4. next time you open ezgenerator, your fonts should be available in list of fonts (at the bottom of list)


notice:

Internet Explorer only supports .eot type fonts

Firefox, Chrome, Safari, and Opera support .ttf and .otf type fonts.


if you need to support all browsers :

visit http://www.fontsquirrel.com/

with this service you can create all different font files and css rules

after this, copy font files to fonts folder (3.) and css rules to (1)


Print  posted by miro   CSS tags:  font-face • fonts   permalink
5 1

How to use Messages Panel in Admin Page


Messages panel is a features that alow registered users and admins to communicate to each other using messages.
For visitors and editors this system provides friendship features so that only invited users can send/receive messages.
If logged user is admin or EZG admin he/she can sends messages to every activated and confirmed user.
The 'Messages' can be transformed to private admin communication system if admin disable this future for ordinary users.
Another useful features is that every message can be sent to email.


For simplicity, in this tutorial every visitor, editor or user with access on page level will be called User.


There is no extra setting in EZG to enable "Messages" panel.
However "Messages" panel for users can be disabled by admins in
online admin page 'Messages'->settings and check "DISABLE MESSAGES FOR USERS".


So to visit you received/sent messages users need to be logged in and to go to their admin page -> 'Messages' panel.
Using this feature is intuitive. You can recognize it in many email systems.
There are four button (tabs). For admin there are three:

  • received messages (#new messages) - table of all received messages; #new messages is number of not read messages;
  • sent messages  -  table of all sent messages;
  • friends - table of all friend users (this tab is optional only if admin has enabled "ENABLE FRIENDSHIP" in messages settings tab); admins don't have this tab; Here users can send/confirm/block friend requests to/from other users;
  • settings - this tab is different for users and for admins. Admin has full control over messages settings, while users have only one for now ( HIDE BLOCKED USERS, which will hide blocked by himself friend users)

Composing (Sending) new message can be done in three places:

  1. in received messages: using compose message button; when hover on username in received message table; when hover on subject using reply or forward link;
  2. in sent messages: using compose message button; when hover on username in sent message table; when hover on subject using forward link;
  3. in friend tab (if it is enabled) when hover over username in friends table

Users can't send messages to users which are blocked friends, not confirmed friends, not active or not confirmed users.
Users can send messages to all ordinary users (confirmed and active) if "ENABLE FRIENDSHIP" is not checked in admin messages settings tab.
Users can send to admins if "USERS CAN SEND MESSAGES TO ADMINS" is enabled by admins of the site.
Users can receive messages from all admins (admin users or EZG admin).
Message can be send to multiple users/admins when hold Ctrl key in drop-down with available users in Compose message form.


Print  posted by miro   General tags:    permalink
0 0

How-to add font-size selector in template


use TEXT SIZE macro from Macros Panel

you can add this macro anywhere on page or you can use it inside template editor, html tab (to include macro on all pages)


Print  posted by miro   Templates tags:    permalink
0 0

HowTo o Show User-Specific page after login


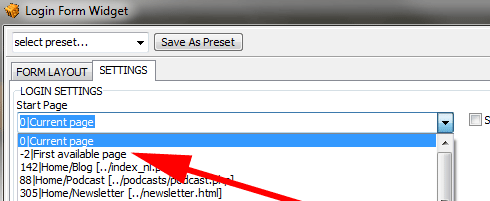
1. add login widget on one of the pages, in widget setting, set start page to : First Available Page


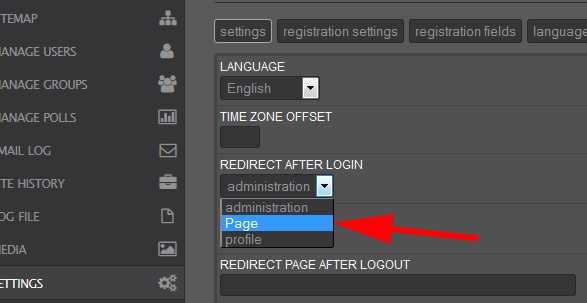
2. In online administration, registration settings set "Redirect After Login" to "page"


Print  posted by miro   Administration tags:    permalink
0 0

I lost my EZGenerator registration. Can you re-send it?


Your EZGenerator registration and installation stay available to you at all times.
Find them on your 'my account' page under 'my licenses' (sign in might be needed)


sign in process


Your \\'my account\\' sign in codes are:
Re-download the registration file from your 'my account' page after sign in to www.image-line.com
- Sign in e-mail: The e-mail address you used to order EZGenerator
- Password: The password you entered/chose yourself when ordering.

Click the image below to see a video of the complete process:
EZGenerator sign in process

When you forgot your password:
Go to the password recovery page: Forgot your password? Retrieve your password here!
When you forgot your sign in e-mail and/or password:
Contact our registration staff by creating a private 'support ticket'
Add your original ordering information to the message (name, postal address, e-mail, payment ID, ...)


EZGenerator 3 users:
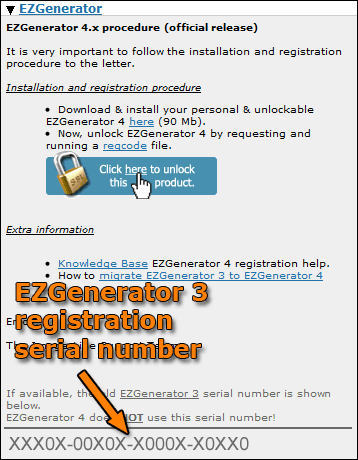
Your old EZGenerator 3 serial number is also listed on the 'my account' page under \\'my licenses\\'
Find it at the bottom of the EZGenerator registration information box


EZGenerator 3 serial number location


Print  posted by ief   Install/Registration tags:  registration • serial   permalink
0 0


[prev] 1 ... 12 13 14 [15] 16 17 18 ... 23 [next]71-75 of 115


CATEGORIES


TAGS


RECENT ENTRIES