How to add shipping type based on total weight of products.


Shipping type based on total weight of products is great if in your shop there are heavy items which need extra charge.


To enable this future have to:


1. Create custom data field named: shippingweight with Field type: number in EZG shop settings. If you have troubles of adding extra field just read this article:

"How to add and use shop custom fields"

2. After created shippingweight upload and update db

3. Now go to your products and fill some values for shippingweightThis value is number so you don't have to add unit (like kilogram, pounds and etc.)

4. Need to set some shipping settings: change SHIPPING TYPE to 'based on total weight' and add some SHIPPING OPTIONS in online shop settings panel.


Print  posted by miro   Shop/lister tags:  shipping • weight • shippingweight   permalink
0 0

How to change editable image (banner) size


Each editable image is built by 2 or 3 files - banner.jpg (the actual banner image), banner.map (opacity mask file) and banner.src (which is renamed banner.jpg and contains background without image). If banner.src is not present main banner.jpg is used as background. The mask file is grayscale .gif, which means grayscale from 0 to 255. Black (0) means full opacity, white (255) stays for no opacity.

All 3 files have same width and height.


You will need to edit banner.jpg in order to change the editable image size:

  • Go to c:\Program Files\EZGenerator\Data\[project]\template\images folder
  • Edit file banner.jpg
  • In case the editable image contains sitename, you will also have to edit two parameters inside site.ini file in c:Program Files/EZGenerator/webtemplates/__shared folder. Open the file, find section [COMPANYTITLEIMAGE] and edit IMAGEWIDTH and IMAGEHEIGHT parameters, which define postion of text upon the image.

We use banner.jpg name here, but it is just an example name. You can have cti_0.jpg, cti_1.jpg or other name.


For some templates you have to also edit few styles in Template Editor, CSS tab - #topbanner, #banner and #search.


Print  posted by miro   Templates tags:    permalink
4 1

How To Create Bundles in Shop Page


Bundling is basically taking a product you sell and offering it along with another product (this could be an accessory or simply a related item) thereby creating a product bundle.


How to create a bundle?

Go to online admin page. Will see BUNDLES navigation link click on it. A Bundle panel is opened (like this).

To add new bundle click on "Add bundle" button. Will see bundle form.

Each row is a product which is selected with two drop-downs: Categories and Products. When chose a product, you can specify discount (in %) from 0 to 100.

A new price for this product will be calculated base on the discount. Or can type a new price and discount will be calculated.

Notice: this new price will be available only in this bundle and will not effect when buy this product out of the bundle.

In the beginning of the row is a radio button - Primary item. In order to successfully save a bundle only first item must be primary.

When bundle is saved will see it in bundle table below. Each bundle can be deleted, published/unpublished and edited.

Third column is PRIMARY ITEM and it contains the name of the primary item in the bundle with link to front detail page of the item.


Where to add bundle macro?

  1. In order to view bundle in your shop page have to add  %bundles% macro in product detail page.
  2. You need Minicart or Basket cart in shop detail page. "How to put Mini-Cart or Cart page (Basket) in Pop Up window (Hidden Div)
  3. to enable 'USE AJAX' option in shop settings.

Notice: Bundle will be visible only in Primary item front detail page. NOT in other items which are included in bundle.

This is what users will see when visit primary item page.

If item has discount > 0 will see discount in % in red rectangle in right top corner of item image.

The old price is line-through and it is in grey color. New discounted price is below.

After all items in bundle will see Buy link with total price.


When click on "Buy all for" link the bundle will be added in cart.

In order to see bundle description: item1 + item2 + .... ( Nikon D750 + 16GB Extreme SD card )

have to add new macro %bundle_description% in cart and in online notification email messages.


Print  posted by miro   Shop/lister tags:  bundle   permalink
0 0

How to Create Global Slideshow and Use it in Iframe (Global Banner) or in URL and share it.


Many times there is need to create global slideshow which can be used in all pages in the site in any place or can be shared with other sites using prepared URL.

In this tutorial will show you one of the usages of Global Slideshow: creating global banner in iframe with content of global slideshow, which will be visible in all pages.


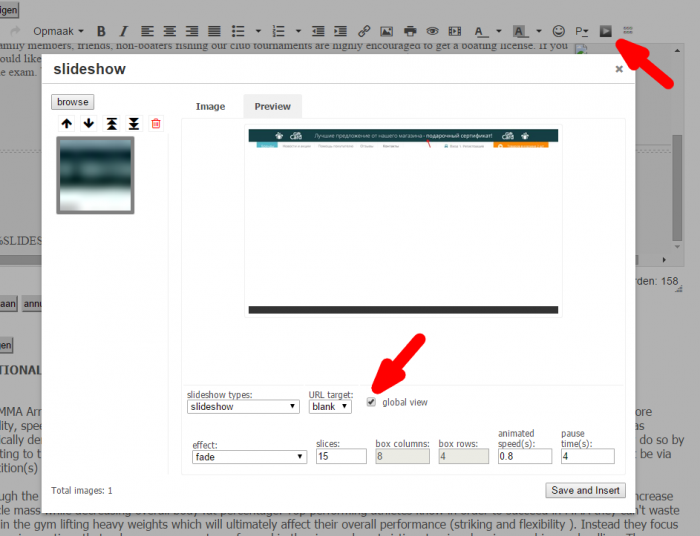
Global slideshow can be created in any editor (tiny or innova) where slideshow button is present. To enable global view of  slideshow in Preview mode check Global view setting. Now to create global banner, added image need to be with big width, not resized and other slideshow settings are good to be those from image below. If you don't want to show this slideshow anywhere but only in global banner create this slideshow in hidden oep page or not published blog event.

Second step is to create global iframe in EZG. There are two ways to add html tags in all pages: 

1. in Template HTML editor (advanced users only!)

2. in Srcipt and Headers in Project Settings in BODY tab

In one of those places add this html code:


<iframe class="global_slideshow" scrolling="no" data-id="25" data-css=".nivo-caption{display:none !important}" style="width:100%;height:50px"></iframe>


  Where:

 + class attribute of the iframe has to be "global_slideshow" (required)

 + data-id (a  required attribute) is number (in this case 25) of slideshow id which can be get from sldieshow macro in editor: {% SLIDESHOW_ID(25) %}

 + data-css attribute is optional and is used to add custom css which will affect content of the iframe (in this case captions of sldieshow slides will not display)

 + can add style attribute (in this case width of the iframe will be 100% and height 50px).


Then save changes and upload. Will see in any page your slideshow in iframe and will looks like banner. You can edit this slideshow in any editor (tiny or innova) where slideshow button is present.


Global slideshows can be use not only in iframe with class "global_slideshow" but with direct URL of global slideshow:

your_site_host/site_folder/documents/centraladmin.php?process=slideshow&sid=25&css=.nivo-caption{display:none%20!important}


Notice: Only Global slideshows can be viewed with this URL


Print  posted by miro   General tags:    permalink
0 0

How to display (another) page inside page


by using jquery/ajax you can put output of any file from your website inside container :

to do this add following code (through insert html)


<script type="text/javascript">
$.ajax({url: "documents/myphp.php", success: function(data){$("#output").html(data);}});
</script>


above code will call documents/myphp.php page and display result inside div with id "output" :


Some other options available:


To make this content load AFTER page is loaded (to speed up the general page load), you can try this:


<script type="text/javascript">
$(document).ready(function() { $.ajax({url: "documents/myphp.php", success: function(data){$("#output").html(data);}}); });
</script>


$(document).ready(... will force the script to be exacuted after page is prepared, so it will not wait for this action to be finished to show the page.


To make this content load ON CLICK:


<script type="text/javascript">
$(document).ready(function() { $("<em><element></em>").click(function(){ $.ajax({url: "documents/myphp.php", success: function(data){$("#output").html(data);}}); }); });
</script>


 To get only specific element from given page:


<script type="text/javascript">
$(document).ready(function(){$.ajax({url: "documents/myphp.php",success: function(data){var dt=$(data).find("<em><element></em>").html(); $("#output").html(dt);}});});
</script>


<script type="text/javascript">
$(document).ready(function(){$.ajax({url: "documents/myphp.php",success: function(data){var dt=$(data).find("<em><element></em>").html(); $("#output").html(dt);}});});
</script>


<script type="text/javascript">
$(document).ready(function(){$.ajax({url: "documents/myphp.php",success: function(data){var dt=$(data).find("<em><element></em>").html(); $("#output").html(dt);}});});
</script>


$("element") can be any normal CSS selector, for example:

  1. $("#output") - this is any element with ID: "output"
  2. $("div #output") - this is DIV with ID: "output"
  3. $(".myClass") - this is any element with class "myClass"
  4. $("input .myClass") - this is an input with class "myClass"

As you can notice - it uses absolutely same element selections as in CSS, so you can check the Internet for more complex selections (by checking CSS or jQuery selector examples).


Print  posted by miro   Jquery/Ajax tags:  Ajax   permalink
3.8 10


[prev] 1 ... 9 10 11 [12] 13 14 15 ... 23 [next]56-60 of 115


CATEGORIES


TAGS


RECENT ENTRIES